Creative Theme
Set up and restyle your theme to your branding with the below theme tutorials

Pre-Steps
Register a domain name and web hosting
Our themes are only compatible with self-hosted installations of WordPress (WordPress.org)
*Not sure which version of WordPress you have? Here’s how to check
What is a Domain Name?
A domain name is the address of your website that people type in the browser’s URL bar to visit your website. If your website was a house, then your domain name will be its address.
What is web hosting?
Web hosting is the place where all the files of your website live. It is like the home of your website where it actually lives. If the domain name was the address of a house, then web hosting is the actual house that address points to.
Choose a Hosting Provider
Once you’ve settled on your brand name, it’s time to secure your web address.
If you choose that WordPress is right for your business, you’ll need to register for a domain name and web hosting. This may seem overwhelming, but being self-hosted is actually the most professional + affordable option - a win-win!
TIPS:
- You can’t really get it wrong when selecting a provider, they all do the same thing!
- If you’re in the mood for research, some factors you could compare would be price of services and customer service track record.
- If you have a recommendation from a mentor or friend that you trust, go with that one!
ACTION STEP: Have a hosting provider in mind for the next step
Select a Domain Name
Next, it's time to select your domain name. This will probably be your business name followed by .com or .com.au
If that’s not available you can get creative, but I would encourage you to think about the following:
- Does this name reflect your niche? If so, cool
- Does this name attract your desirable target audience? If so, awesome
- Does this name have any negative feelings that could turn your audience off? If so, try another!
- Avoid dashes in domain names, such as; studio-spark-web-design.com ~ It looks spammy and is not recommended.
Don’t try to put keywords in your domain because you think Google will like it,such as; bestofficestationery.com it’s not a ranking factor and you’re much better off choosing a branded domain with your business name.
 You can search for your domain name at Instand Domain Search
Which extension should I choose?
If your business is local, a .com.au is a great option as it builds instant trust. Please note, you will need an ABN in order to register a .com.au
If your business may service clients and customers internationally and not just in Australia, I would recommend choosing a .com
Love your chosen domain name but the .com is taken? You could choose to opt for a .co
An acronym for “company” .co is already a recognisable domain extension that offers a global option for branding and in my opinion is a valid runner up to .com domain.
 There are lots of new extensions on offer but this would not be recommended.
Another tip, because the number of available .com domain names are dwindling from competition, you will notice there are lots of new extensions on offer such as .net, .xyz or .pink and a heap more - but I don’t recommend this. The reason is, some people don’t even know that that is a URL to put into a browser, and you want to make it as simple as possible for customers to go to your website!
ACTION STEP: Go to Instand Domain Search and search for your chosen domain name
Purchase Your Chosen Domain Name & Hosting
You now hopefully have a hosting provider in mind AND a domain name selected 👍
ACTION STEP: Now you're ready to go to your hosts website and purchase your domain name and hosting
Bluehost offers cheap and solid hosting if you’re just starting out with a personal blog or small business website. They are a full provider of domains, hosting and SSL certificates.
Domains start from $11.99/yr | Hosting is super affordable at $2.95/month & you can get a free domain if you purchase a 12 month hosting plan!
Get Started with BlueHost
NameCheap is a great option if you plan on having a couple of websites. They are a full provider of domains, hosting and SSL certificates. Domains start from $9.95/yr | Hosting is super affordable at $2.88/month for up to 3 websites.
Get started with NameCheap
For this tutorial, I'll use SiteGround as the example as they are the hosting provider I recommend.

Select the hosting plan you like and you'll be directed to the next step to register your selected domain name.

Next, you'll proceed to the check out page. Just add in all of your business details to submit your order.

Once you purchase your domain name and hosting, you'll receive a welcome email from your hosting provider usually with a few details. Be sure to record all of your domain and hosting details for safe keeping - these can easily get lost in emails and they're really import details.
Next, installing WordPress is a simple process within your hosting dashboard. You can google 'Install WordPress [your hosts name]" and find your hosts' tutorial (as each is a little different ) and they will have a simple tutorial to follow.
Siteground's tutorial looks like this. Or you can ask your hosting provider nicely to install WordPress it for you - they usually do it for free!
Woo Hoo you officially have a website! The next part is the fun part - your website design⚡
is wordpress right for me?
You might be thinking, before I go about investing all this time and energy, is WordPress the right platform for me?
And it's a great question to ask before you dive in!
If your looking to create a professional and stylish online presence, especially one that is SEO-friendly and adaptable to new features, I recommend WordPress wholeheartedly. Here's a short summery of the benefits:
- WordPress powers about 24% of the all sites on the internet
- You own the rights to your website
- Cost effective (especially so if you evolve in having multiple sites / landing pages / sales pages)
- Extensive control over your site(s)
- Extensive design & functionality
- It’s extremely powerful & adaptable to features
You can read more about why I think WordPress is awesome here.
From a designers perspective – it’s vital your client’s web platform will be SEO-friendly, secure, adaptable to new features and technologies that the future may bring, and able to manage their site themselves. WordPress delivers in all these areas.
Regardless of if you choose WordPress or not as your web platform, I'd recommend going with whichever will suit your needs best and is the right option for you 🙂
install wordpress
Installing WordPress is a simple process that takes less than five minutes to complete.
The DIY install instructions are below (Or you can ask your hosting provider nicely to install it for you - they usually do it for free!)
https://youtu.be/xd5siHqv-v8
The easiest and quickest way to install WordPress is through Softaculous, a popular auto-installer. It allows you to easily install popular web applications like WordPress with just a few clicks. Good hosting use Softaculous in their control panel.
Simply login to your Control Panel (or cPanel for short) account - your hosting company would have provided this information when you signed up to host your website.
1. Go to your control panel URL. Example: blogname.com/cpanel
Login with your username and password.
Look for Softaculous icon or WordPress installer icon. You will find them under Auto Installers section.
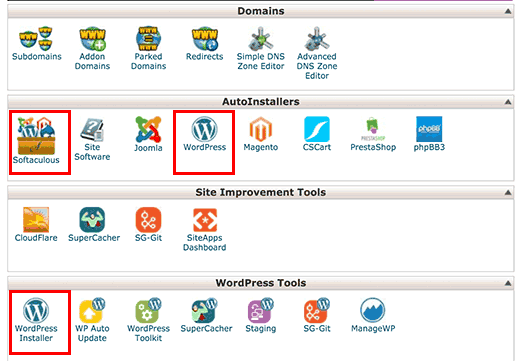
- Clicking on any of these icons will launch Softaculous auto-installer for WordPress. First you will see an overview of WordPress. You need to click on the Install tab to continue.

Softaculous will now ask you where you want to install WordPress.
Choose HTTP for every situation, except if your are launching your site with ecommerce and processing payments, then choose HTTPS.
It’s up to your personal prefernce if you would like http://www or http:// - It doesn’t matter which one you choose but you will have to remeber it as this will be your proper URL.
After that, you need to choose the domain name where you want to install WordPress. Most users want to install WordPress in their domain name (like example.com) In that case, you need to make sure that the ‘In Directory’ field is blank.
Scroll down a little, and you will see the site settings section.

Under this section, first you need to provide a title and description for your WordPress site. Don’t worry you can easily change this later.
Next, you need to choose an admin username, password, and email address.
Make sure that you enter correct email address in the admin email field. This is where WordPress will send notifications and password reset link if you ever forgot your password.
Rest of the options on the screen are optional. You can now click on the install button to run the installer.

Softaculous will run the installer using the settings you provided. You will see a progress bar with installation status. It will take a couple of minutes, do not close the window until the progress bar reaches 100% otherwise this may affect your WordPress installation.

You will see a success message after the installation is finished. It will also show you a link to your website and another link to your WordPress admin area.

To login to your website dashboard place /wp-admin on the end of your domain, for example: http://www.blogname.com/wp-login.php
And that’s it, you’ve successfully installed wordpress.org!
WordPress Dashboard
Introduction to the WordPress dashboard
Installation
install genesis
clicking on the zip file and choosing “Extract All” or “Unzip”.
2. After it’s unzipped you should see the following files:
• Theme (zip file – do not unzip this )
• Genesis ( zip file – do not unzip this )
• Set Up Guide ( PDF format )
• Demo Content
4. Log in to your WordPress.org account and click on “Appearance” then “Themes” on the left hand side of your dashboard.

5. Next click on “Add New” at the top of your page then click on “Upload Theme”. Click on “browse”, find/choose the Genesis zip file you saved to your computer, then click on “open”. Click on “Install Now” then click on “Activate”.
5. If you get a message that says the Genesis Framework needs to be updated,
please go ahead and updated it.
install theme
1. Go to your computer folders and find the zip file you saved to your computer. Unzip the file by right
clicking on the zip file and choosing “Extract All” or “Unzip”.
2. After it’s unzipped you should see the following files:
• Theme (zip file – do not unzip this )
• Genesis ( zip file – do not unzip this )
• Set Up Guide ( PDF format )
• Demo Content
3. Log in to your WordPress.org account and click on “Appearance” then “Themes” on the left hand side of your dashboard.
4. Next click on “Add New” at the top of your page then click on “Upload Theme”.
5. Click on “browse”, find/choose the Theme zip file you saved to your computer, then click on “open”. Click on “Install Now” then click on “Activate”.
Plugins
How to install free plugins
1. After you are logged into your WordPress dashboard click on “Plugins” then “Add New”

2. In the search box, search the plugin’s name.
3.Click “Install” then “Activate”
4. The plugin is now installed.
recommended plugins
I’ve recommended a small number of plugins to help you get the most out of your theme.
1. From your WordPress dashboard, navigate to Appearance > Install Plugins
2. Select all plugins, then from the drop-down menu choose Install and then click Apply. If the plugins do not install as a batch, try installing each one individually.
3. Once they’re installed, Activate all of the plugins.
Recommended plugins to install for this theme include:
Social Icons – ‘Simple Social Icons’
Email Opt-in – ‘Genesis eNews Extended’
Share Buttons – ‘JetPack by WordPress’
Customize Settings
Choose your url structure
2. Select “Post Name”
3. Save
upload demo content (optional)
IMPORTANT Please make sure to install all recommended plugins as well as making sure your theme and Genesis are updated to the latest version.
1. Go to Appearance > Import Demo Data

2. Click on the button that says Import Demo Data. Make sure all recommended plugins are installed and activated before beginning the import in order to capture all settings.
3. Your demo content is now installed!
ERRORS
If you receive failed to import errors similar to the ones below, you can continue setting up your theme. These errors are only dummy content that didn’t import (example posts and pictures) and are not necessary to continue setting up your theme.

fit existing images correctly
Take a look at your blog and see if your images look okay or are they stretched? Gotten small? If they are then you’ll need to install and run the plugin called “Regenerate Thumbnails“. Why? Every blog design is different and the widths of the post areas will be different sizes. The blog design you were using before may have had a smaller/wider post area.
1. Go do your WordPress dashboard and click on Plugins. Next click on “Add New” at the top then type in Regenerate Thumbnails in the search area. Install it then activate it.
2. Next go to “Tools” then click on “Regen. Thumbnails”. This is where you can run it. If you have a lot of images then it may take a while for the plugin do it’s magic.
choose your layout
1. From your WordPress dashboard click on “Genesis” then “Theme Settings”.
2. Next look for “Default Layout” and click on the layout you want to use for your home page.

3. Click “Save Settings” at the top of the page.
post display
To display post excepts and a read more link:
1. Navigate to “Appearance” > “Customize”
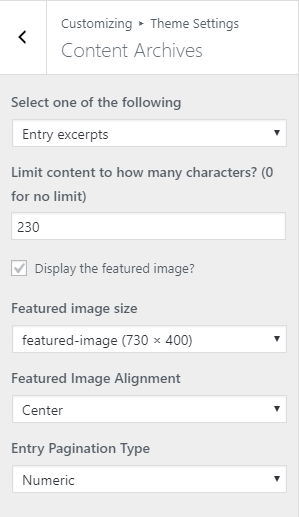
2. Select “Theme Settings” then select “Content Archives”
Please Note* In order for an image to appear, you will need to have a featured image selected for each post and tick the ‘display featured image’ box as shown below.
menu
Once you’ve added some pages, you can create your menus:
1. Navigate to “Appearance” then > “Menus”
2. Name your menu something like “primary navigation”
3. Check the boxes of the pages you wish to add to the menu.
4. To create a sub-menu, simply drag a link slightly over to the right underneath the parent link.

5. Make sure the pages are in the order you wish.
6. Click the “create menu” button at the bottom to finally create the menu.
7. Check the box at the bottom that says “primary navigation menu” to set this menu in the top menu location.
8. Save
contact form
Navigate to “Contact” then “Contact Form.” Click “Mail” to verify your ‘To’ and ‘From’ email address settings are correct as follows:
To – your preferred email address eg, hello@sugarandcode.com
From – [your-name] <wordpress@yourblogname.com>
Save!
It’s always a good idea to run a test contact form and check you receive it in your inbox!
Adding A Form From Scratch
1. If you haven’t yet, install the Plugin “Contact Form 7.” Navigate to “Contact” then “Contact Forms”
2. Here you can create multiple forms. Click “Add New” to create a form.

3. Click on the attributes (eg. name, email, message) to display that attribute in the form.
4. Save the form.
5. Check your ‘sender’ settings by clicking on “Mail.” Verify your sender’s settings as follows:

To – your preferred email address eg, hello@sugarandcode.com
From – [your-name] <wordpress@yourblogname.com>
Subject – [your-subject]
Message Body –
From [your-name]
Message [your-message]
Contact Info [email]
6. Save.
7. Copy the shortcode which looks something like this: [contact-form-7 id=”1234” title=”Contact form 1”] And paste the shortcode wherever you’d like the form to appear, such as your contact page.
For further information, please refer to the publishers own documentation.
Widgets
Set up your widgets
What’s a widget? A WordPress Widget is a small block that performs a specific function and were originally created to provide a simple and easy-to-use way of giving design and structure control of a WordPress theme to the customer.
1. With all your plugins installed go to “Appearance” > “Widgets”

2. Drag and drop the widgets into the following locations like the image below. We will configure each widget as we go along.

call to action boxes (optional)
The home page Call To Action links are the following clickable boxes and buttons:

Please note* The first widget will display the left box, the second widget will display the middle box, and the third widget will display the right link box.
Then in the Genesis Featured Page widget areas, select the settings as follows:

2. Important* Make sure you have set the featured image you’d like to display for that page.
To do this; navigate to “Pages” > select the page title and upload a featured image for that page. Save.

related posts
1. Navigate to “Appearances” > “Widgets”
2. If you haven’t already, drag the “Genesis – Features Posts” to the “After Entry” widget.
3. Configure the settings like the image below.
4. Save!

blog categories
If you wish, here’s how to set up a dedicated “blog categories” page like the demo:

1. Navigate to “Pages” > “Add New”
2. Give your page a title (we called ours blog categories)
3. Under the “page attributes” section, assign the page to the “categories” template.
4. Click “publish”
5. Navigate to Appearances” > “Widgets”
6. If you haven’t already, drag the “Genesis – Featured Posts” to the “Blog Categories” widget
7. Configure the settings like the mage below.

8. You can add as many of the Genesis – Featured Posts widgets to this section as you want, just give each one a different name and select a different category for each one. All other settings are the same.
9. Save!
instagram gallery
2. Login

3. Recreate the demo’s settings as below:

3. After you have previewed how it would look, click the “Get Code” button and copy the code.
4. From your WordPress dashboard, navigate to “Appearances” > “Widgets”
5. From available widgets, drag the “Text” widget to the “Instagram” widget.
6. Paste the code.

7. Save!
Social Channels
2. Next, navigate to “Appearance” then “Widgets”.
3. Under “Available Widgets” look for “Simple Social Icons”. Click and drag this widget to the “Primary Sidebar” widget.
4. Configure the settings like the image below and fill in your social media URL’s

5. Save!
Brand Your Blog
site title
1. After you are logged into your WordPress dashboard click on “Appearance” then “Customize”.

2. Here you can add your site title and optional tag line.
You can also add a favicon (site icon) if you wish. I’ve included a ‘heart-favicon’ in your web design kit that you can use for this.
4. Save.
If you wish to upload a logo or custom header, you can do this in the next step.
Affordable logo
upload logo / header
1. Navigate to “Appearance” then “Customize”.
![]()
2. Next click on “Header Image” then “Add New Image”.
3. Upload your header image or choose it from the images already on your blog. Then click on “Select and Crop”.
4. The next screen at the bottom click “skip cropping”.
5. If the preview on the right looks good to you, click “Save & Publish” then view your blog.
choose your colors
1. Navigate to “Appearance” > “Customize” >”Color Scheme”

2. Here you can choose your own custom colors. Preview it on the right. To use the demo’s colours, just click “Select Color” > “Default”
3. Once your happy with the colors click on “Save & Publish” at the top.
The theme’s demo colors are as follows:
Logo & Site Description: Light Pink #fbeee7
Navigation Link: Black #000000
Navigation Link (Hover): Pink #ffcce6
Body Text: Black #000000
Link: Black #000000
Link (Hover):Pink #ffcce6
Post Header: Black#000000
Widget Header: Pink #ffcce6
Sidebar Border: Light Pink #fbeee7
create your welcome image

2. Click on ‘Resize’ on the left (near the bottom of the options). Change the first number to 250 (this is the size we use in our demos). Then tick ‘Keep Proportions’ and ‘Apply’.

3. Next click on ‘Frames’ (on left hand side – looks like an actual picture frame). Then click on ‘Shape Cutouts’.
4. Choose the Circle (or any other shape!) then click and drag the circle where you would like it. Then tick ‘Transparent Background’ and ‘Apply’.
If your starting image was rectangle and threre’s now a lot of clipboard showing, I’d recommend cropping the image – this will make sure there’s no extra white space when you upload it to your sidebar.

Click on ‘Basic Edits’ (right at the top) and click ‘Crop.’ Click and drag the crop tool so the image is nice and centred. Then click ‘Apply’

You’ve created your circle blog pic! Now you’re ready to download it.
5. Click ‘Save’ at the very top to save it to your computer. Keep the file as a PNG (so you’ll have a transparent background) and click ‘Save to my computer’
![]()
upload your welcome image
2. Find the “Text” widget on the left and drag it into the “Primary Sidebar”
3. Click “Add Media” and upload your welcome image then select insert. To center align the image, click the image and select the center align icon.

4. Next you can write your welcome text underneith.
5. Save the widget
share buttons
You’ll first need to install the plugin called “Jetpack by WordPress.com”. Follow the steps below.
From the dashboard navigate to > “Plugins” > “Add New”
On the right side where it says “Search Plugins” type in ‘Jetpack by WordPress.com’. Find the plugin then click on “Install Now”. Once it’s uploaded, click on “Activate Plugin”.
You’ll be asked to create a jetpack account, then scroll down right to the bottom and select start for FREE
After your account is created and you are logged in, go to “JetPack” > “Settings” > “Sharing” and enable buttons


Next, go to a single blog post on your site. Scroll down the end until you see the buttons > click “Customize Buttons”
 Click the social channel you’d like to offer sharing for and drag it below under “Enabled Services”

The demos settings are as follows:
Button Style: Icon + Text
Sharing Label: SHARE
Show Buttons On: Posts
where to find images for your brand
Your are welcome to keep using any and all images within the templates. They are sourced from unsplash.com and can used for free for commercial and non commercial purposes 👍
Unsplash.com is probably the best resource to find FREE high quality images for your brand and your website.
Canva.com* premium subscription has millions of photos and thousands of templates to choose from from $17/month.
Hautestock.co helps women-owned businesses and brands save time, stress less, and sell online using their carefully curated stock photos and customizable templates for $179 for 3 months.
Moyo-Studio offers lifestyle inspired photography, photo mockups and scene creators that are stunning and modern.
Deathtothestockphoto.com is an Artist Owned Co-op that provides you with the freshest authentic stock photos and videos; with unlimited downloads and new work added every month.
Kindly note an * indicates an affiliate link, which means that if you decide to purchase through this link, studio spark will receive a commission at no extra cost to you. We only ever recommend products and services we genuinely love!
Create and format a blog post
First, make sure you have the plugin Classic Editor installed before beginning
1. Navigate to Plugins > Add New
2. In the search box, search for ‘classic editor’

3. Click “Install” then “Activate”
You’re ready to start blogging !
1. Navigate to Posts > Add New

2. Here you can type straight into the post editor, or copy/paste from another word processor like word or google docs.
3. Set your blog’s featured image by scrolling down to Featured Image > click ‘Set Featured Image’ and follow the propts to select or upload an image of your choice.

4. Publish the blog post when you’re ready by clicking the blue ‘Publish’ button and your theme will format the post for you 👍

Email Opt-in
register an account
If you don’t already have an email marketing provider, I recommend MailChimp (free), GetResponse (premium) or Seva formally ConvertKit (premium)
MailChimp is a great place to get started if you’re beginning to grow an email list and send the occasional newsletter. It’s also free to get started.
Get Started with MailChimp
GetResponse is an excellent choice if you’re ready to start delivering autoresponders, content upgrades and interacting with your list. (I feel that they’re the middle ground between Mailchimp & Convertkit) They offer excellent features for a reasonable price including unlimited sending, autoresponders and even landing pages.
Get Started with GetResponse
Seva formally ConvertKit is in my opinion the best email marketing software designed for bloggers. It has a beautiful intuitive interface, allows for unlimited email sending and has all the features you could possibly need!
Get Started with Seva
mailchimp set up
2. Drag the widget “Genesis eNews Extended” to the Primary Sidebar widget.

3. Log into your Mailchimp account and go to “Lists” > “Signup Forms” > “Embedded Forms”
4. Copy/Paste the code into a separate text editor, such as ‘TextEdit’ (Mac) or ‘Notepad’ (Windows).
5. There’s a short snippet of this code that we need that is about 9 lines down and looks like this:
<form action=”//sugarandcode.us8.list-manage.com/subscribe/post?u=52e8706d00b419bad08c5d8b9&id=17b764e2e8” method=”post” id=”mc-embedded-subscribe-form” name=”mc-embedded-subscribe-form” class=”validate” target=”_blank” novalidate>
Copy/Paste the pink highlighted portion of the code into the ‘Form Action’ field of the widget.
Example – my pink highlighted portion of the code is the following:
//sugarandcode.us8.list-manage.com/subscribe/post?u=52e8706d00b419bad08c5d8b9&id=17b764e2e8

6.To add a ‘First Name’ field, type ‘FNAME’ and to add an ‘E-Mail Address’ field, type ‘EMAIL’
7. Save!
Now your email opt-in is configured, all new subscribers’ email addresses will get pushed to your subscriber list!
Convertkit set up
1. If you haven’t already, install the plugin “Genesis eNews Extended”
2. Drag the widget “Genesis eNews Extended” to the Primary Sidebar widget.
3. Log into your ConvertKit account and go to “Forms” > either create a form or choose an existing form.

4. View the form by clicking “View.” Your form will open in a new window. Copy the URL. For example my form url is https://app.convertkit.com/landing_pages/49318
5. Copy/Paste the URL into the ‘Form Action’ field of the widget and add /subscribe.html the to the end of your url. Example: https://app.convertkit.com/landing_pages/49318/subscribe.html

6.To add a ‘First Name’ field, type ‘first_name’ and to add an ‘E-Mail Address’ field, type ’email’
7. Save!
Now your email opt-in is configured, all new subscribers’ email addresses will get pushed to your subscriber list!
set up with another email service
Configuration depends on the service you are using, so be sure to check out the plugin author’s tutorials here.
Ecommerce
selling & Taking payments
If you wish to integrate eCommerce, there are many options to choose from which are compatible with any WordPress website. We’ll keep this list updated as we come across new platforms.
Here are some FREE e-commerce integrations:
Woocommerce – online store integration
A free plugin for WordPress (which powers about 20% off all online stores on the interenet!)
It includes shop pages, products, account creation, cart software and checkout process, automatic transaction emails and sales reporting. It also supports physical products, digital products and affiliate products. A perfect option if you’d like to add a complete ‘online store’ experience to your website.
Thinkific – online learning platform / membership area
Thinkific is built for course creators, but you can use the platform to host any type of program or membership area! And it’s free to host 3 courses/programs/customer areas
Here are some ALMOST FREE e-commerce integrations:
Stripe – Payment Processor
A way to accept payments online. Free to create an account (unlike bank merchant accounts) and you’ll only pay per successful transaction.
DPD* – hosted checkout service
DPD is an easy to use digital publishing platform helping creators sell downloads and deliver content like ebooks, software, themes, music, graphics, and more. Sell how you want with multiple checkout methods. Choose from a single item checkout or a robust multi-item cart. You can also create a membership area and sell access to your content. Publish content by date or drip it out. They offer a 30 day free trial, followed by very affordable pricing.
Gumroad – hosted checkout service
Create pre-sales, physial products, digital products, and even memberships, alllowing customers to pay monthly, quarterly, biannually, or yearly. They offer a simplifed and coversion optimised cart experience. They also have an inbuilt customer manangement system where you can you can easily deliver content and engage with your audience. You can also create a membership area and sell access to your content. Publish content by date or drip it out. A major drawback worth mentioning is that although you can set the currency to AUS$ amounts will be converted and processed in USD$ which your customers may/may not be OK with. They offer a free plan where you’ll only pay per successful transaction.
Kindly note an * indicates an affiliate link, which means that if you decide to purchase through this link, studio spark will receive a commission at no extra cost to you. We only ever recommend products and services we genuinely love!
woocommerce setup wizard
Woocommerce is a perfect option if you’d like to add a complete ‘online store’ experience to your website. Once you install the free plugin you’ll be guided through their SetUp Wizard. Then connect to paypal or stripe and you’ll be up and running in no time!
*I’ve added the basics here, but of course woocommerce offer their own extensive documentation for managing every aspect of your online store, avaliable here > https://woocommerce.com/document/woocommerce-setup-wizard/
1. Install The Woocommerce Plugin
To install woocommerce, simply add the free plugin by navigating to Plugins > Add New > search for ‘Woocommerce’ > Install > Activate.
2. Go Through The SetUp Wizard
Immediately after activating the plugin, you are taken to the Store Profiler. The store profiler will allow you to provide the most important details about your store: where is it based, what industry, which products, etc.

After you finish or skip the Store Profiler stage you’ll have access to a list of the most important tasks that you need to complete to get your store up and running.
3. Add Products
The SetUp Wizard aims to guide you through these steps and finish the store setup as quickly and efficiently as possible. Select add your first product manually, or if you already have products you can bulk import them.

Documentation: Adding Products
4. Set Up Shipping
You can also set the shipping costs for your country and for the rest of the world as well. Adding shipping cost for the rest of the world can be disabled in this step.

Documentation: Shipping
5. Payments
In this step, you can select and activate one or more options to accept online payments and offline payments.
In some payment gateways, such as WooCommerce Payments, Stripe and PayPal, the setup wizard will guide you to create an account with a payment provider, go through the authentication flow and complete the process within this step, so you can start accepting payments right away.

You can also set up offline payments such as Cash on Delivery and Direct Bank Transfer.
Documentation:Taking Payments
6. Store Checklist
Once you complete the Store SetUp Widget, it will be replaced by the Store management widget, which contains useful links to the most used WooCommerce pages for managing your store.

I hope this tutorial helps get your store up and running! Woocommerce is feature-packed and offer extensive documentation on customizing and managing every aspect of your store, avaliable here > https://woocommerce.com/documentation
___
Managing Orders
When a shop starts taking orders, the Orders management page begins to fill up. Go to: WooCommerce > Orders.

Each row displays several details. Some are there by default, others can be added. These are the available options:
- Order number and customer name,
- Date of purchase,
- Order status,
- Billing address,
- Shipping address,
- Purchase total, and
- Actions
Documentation: Managing Orders
FAQs
FAQs & where to find help
Have another question?
Please see the Help Resources as you’ll most likely find your answer there instantly.
Theme Support
All themes have been created for you to DIY on your own, so along with your theme you’ll also receive acess to my set up tutorials, the help resources and support for bug fixes.
Kindly note, theme customizations that are beyond the demo, and/or general WordPress advice are beyond the scope of our theme support.